XMLファイルで指定する場合
android:textSize="24sp"
ソースで指定する場合
btn.setTextSize(24.0f);
2011年6月27日月曜日
Eclipseの日本語化
Eclipseのインストールでも書きましたが。
Pleiadesプロジェクトの日本語プラグインの方がいいみたいなので、メモ
Pleiades 本体ダウンロード から
安定版:http://sourceforge.jp/projects/mergedoc/downloads/49536/pleiades_1.3.2.zip/をダウンロードしてくる。
展開する。
/usr/lib/eclipse/ に移動させる
/usr/lib/eclipse/eclipse.iniを編集して末尾に次の一行を追加
-javaagent:/usr/lib/eclipse/pleiades/plugins/jp.sourceforge.mergedoc.pleiades/pleiades.jar
Eclipse を再起動させる。
2011年6月24日金曜日
カスタムダイアログ2
カスタムダイアログ の記事でコメントがあったのでボタンが押されたときの動作を書いてみました。
ボタンが押されたらテキストを変更します。

main.xmlのソース
ボタンが押されたらテキストを変更します。

package com.custumdaialog;

import android.app.Activity;
import android.app.AlertDialog;
import android.content.DialogInterface;
import android.os.Bundle;
import android.view.LayoutInflater;
import android.view.View;
import android.widget.TextView;

public class CustumDaialogActivity extends Activity {
 /** Called when the activity is first created. */
 @Override
 public void onCreate(Bundle savedInstanceState) {
  super.onCreate(savedInstanceState);
  setContentView(R.layout.main);

  // レイアウトの呼び出し
  LayoutInflater factory = LayoutInflater.from(this);
  final View inputView = factory.inflate(R.layout.about, null);

  // ダイアログのオブジェクト(dlg) 生成
  AlertDialog.Builder dlg = new AlertDialog.Builder(this);

  // ダイアログにタイトルを指定
  dlg.setTitle("タイトル");

  // カスタムレイアウトの表示
  dlg.setView(inputView);

  // アラートダイアログのポジティブボタンがクリックされた時に呼び出されるコールバックリスナーを登録します
  dlg.setPositiveButton("ポジティブ", new DialogInterface.OnClickListener() {
   @Override
   public void onClick(DialogInterface dialog, int which) {
   }
  });

  // ダイアログを表示
  dlg.show();
 }
  public void SetButtonOnClick(View v) {
    TextView message;
    message = (TextView)this.findViewById(R.id.textView1);
    message.setText("新しいテキスト");
   }
}
about.xmlのソース<linearlayout android:layout_height="match_parent" android:layout_width="match_parent" android:orientation="vertical" xmlns:android="http://schemas.android.com/apk/res/android"> <linearlayout android:id="@+id/linearLayout1" android:layout_height="wrap_content" android:layout_width="match_parent"> <button android:id="@+id/button1" android:layout_height="wrap_content" android:layout_width="wrap_content" android:onclick="SetButtonOnClick" android:text="テキスト変更"></button> <button android:id="@+id/button2" android:layout_height="wrap_content" android:layout_width="wrap_content" android:text="Button"></button> </linearlayout> </linearlayout>
main.xmlのソース
<linearlayout android:layout_height="fill_parent" android:layout_width="fill_parent" android:orientation="vertical" xmlns:android="http://schemas.android.com/apk/res/android">
    <textview android:layout_height="wrap_content" android:layout_width="fill_parent" android:text="@string/hello">
    <textview android:id="@+id/textView1" android:layout_height="wrap_content" android:layout_width="wrap_content" android:text="TextView"></textview>
</textview></linearlayout>
2011年6月23日木曜日
JDKをEclipseに設定
Ubuntu にはopenjdkが標準で入っているので、意識しないでもjavaが使えますが、
Eclipse でもopenjdkが設定されていますので、
ダウンロードしたJDKを設定したいと思います。
ウインドウ->設定 から インストール済み JRE を選択します。
追加ボタンを押して、javaJDK をインストールしたフォルダを選択します。
OK をクリックします。

Eclipse でもopenjdkが設定されていますので、
ダウンロードしたJDKを設定したいと思います。
ウインドウ->設定 から インストール済み JRE を選択します。
追加ボタンを押して、javaJDK をインストールしたフォルダを選択します。
OK をクリックします。

2011年6月21日火曜日
バーチャルディバイスの日本語化
MENU ボタンをクリックして Settings をクリックする。

画面を下から上にドラッグして
Language & keyboard をクリックする

Language & keyboard settings から
Select language を選択

画面を下から上にドラッグして日本語を選択


画面を下から上にドラッグして
Language & keyboard をクリックする

Language & keyboard settings から
Select language を選択

画面を下から上にドラッグして日本語を選択

Android SDKをダウンロード・設定
http://developer.android.com/sdk/index.html からダウンロードしてくる。
解凍する。
Eclipse の ウインドウ->設定からAndroidを選択する
SDK Location: に参照から、解凍してできたフォルダを選択する。

ウインドウ -> Android SDK and AVD Manager を選択
Available Package を選択してパッケージを追加します。


successfully と表示されたら成功です。
うまく インストールできなかったら、android-sdk-linux_x86フォルダの書き込み権限を確認してみてください。
Virtual devices を選択してヴァーチャルディバイスを作って実効してみる。
New... ボタンをクリックして、
Create new Android Virtual Device(AVD)を表示させる。
Name: 欄に適当に名前を付ける
Target: 欄はターゲットとするアンドロイドのバージョンを選択する。
Skin: Default を選択する
Create AVD をクリックして完了

Start... ボタンをクリックして実行してみる。
Launch Options が表示されたら Launch ボタンをクリックする。
cpu使用率100%近く消費 約5分後に表示完了

2011年6月20日月曜日
Java Development Kit (JDK)のインストール
# sudo add-apt-repository 'deb http://archive.canonical.com/ lucid partner'
# sudo apt-get update
# sudo apt-get install sun-java6-jdk
# sudo apt-get update
# sudo apt-get install sun-java6-jdk
Eclipseのインストール
パッケージからEclipseをインストールする。
Eclipse の日本語化
Help -> Install New Software を選択
Add... を押し、Location: 欄 に
http://download.eclipse.org/technology/babel/update-site/R0.8.0/galileo
利用可能なパッケージが読み込まれるのを待つ
Eclipse 全般の UI を日本語にし体場合、
Babel Language Packs in Japanese の先頭の + を押し
Babel Language Pack for eclipse in Japanese にチェック、
すべてのプラグインを含めて日本語にしたい場合、
Babel Language Packs in Japanese にチェック。
Next> をクリック。
ライセンスに同意し
て、Finish をクリック
Security Warning が出てもOKをクリックする。
Eclipseを再起動出せる。
2011年6月10日金曜日
指定時間からカウント
1時間からスタートの場合
1時間は3600秒
final Chronometer chronometer2 = (Chronometer) findViewById(R.id.chronometer2);
long time2 = SystemClock.elapsedRealtime() - 3600*1000;
chronometer2.setBase(time2);
chronometer2.start();
time2 の値はマイナスになっても大丈夫な様だ。
1時間は3600秒
final Chronometer chronometer2 = (Chronometer) findViewById(R.id.chronometer2);
long time2 = SystemClock.elapsedRealtime() - 3600*1000;
chronometer2.setBase(time2);
chronometer2.start();
time2 の値はマイナスになっても大丈夫な様だ。
クロノメーターのテスト:Android Chronometer


下記の順番以外正常には動かない。
スタートボタン->ストップボタン->リスタート
スタートボタン->ストップボタン->スプリットボタン
package com.GetTextTest;

import android.app.Activity;
import android.os.Bundle;
import android.os.SystemClock;
import android.view.View;
import android.view.View.OnClickListener;
import android.widget.Button;
import android.widget.Chronometer;
import android.widget.TextView;

public class GetTextTest extends Activity {
 private long stopTime;
 private long startTime;

 /** Called when the activity is first created. */
 @Override
 public void onCreate(Bundle savedInstanceState) {
  super.onCreate(savedInstanceState);
  setContentView(R.layout.main);

  Chronometer chronometer = (Chronometer) findViewById(R.id.chronometer1);
  final Chronometer chronometer2 = (Chronometer) findViewById(R.id.chronometer2);

  chronometer.setBase(SystemClock.elapsedRealtime());
  chronometer.start();

  // スタートボタンが押された時
  Button startButton = (Button) this.findViewById(R.id.start);
  startButton.setOnClickListener(new OnClickListener() {
   @Override
   public void onClick(View v) {
    /** ボタンを押したときの処理 **/
    chronometer2.setFormat("スタート %s");
    // 初期値の設定 設定しないと端末が起動してからの時間からスタート
    chronometer2.setBase(SystemClock.elapsedRealtime());
    chronometer2.start();

    // スタートボタンを押した時の時間を取得・表示
    startTime = SystemClock.elapsedRealtime();
    TextView textStart = (TextView) findViewById(R.id.startText);
    String asText = startTime + "ms";
    textStart.setText(asText);
   }
  });
  // ストップボタンが押された時
  Button stopButton = (Button) this.findViewById(R.id.stop);
  stopButton.setOnClickListener(new OnClickListener() {
   @Override
   public void onClick(View v) {
    /** ボタンを押したときの処理 **/
    chronometer2.stop();
    // ストップボタンを押した時の時間を取得・表示
    stopTime = SystemClock.elapsedRealtime();
    // ストップボタンを押した時の時間
    TextView textStop = (TextView) findViewById(R.id.stopText);
    String asText = stopTime + "ms";
    textStop.setText(asText);
   }
  });
  // スプリットボタンが押された時
  Button splitButton = (Button) this.findViewById(R.id.split);
  splitButton.setOnClickListener(new OnClickListener() {
   @Override
   public void onClick(View v) {
    /** ボタンを押したときの処理 **/
    // 初期値の設定 設定しないとプログラムが起動してからの時間からスタート
    //chronometer2.setBase(chronometer2.getBase());いらない
    chronometer2.start();
   }
  });
  // リスタートボタンが押された時
  Button restartButton = (Button) this.findViewById(R.id.restart);
  restartButton.setOnClickListener(new OnClickListener() {
   @Override
   public void onClick(View v) {
    /** ボタンを押したときの処理 **/
    long time1 = stopTime - startTime;
    long time2 = SystemClock.elapsedRealtime() - time1;

    chronometer2.setBase(time2);
    chronometer2.start();

   }
  });

 }
}
<?xml version="1.0" encoding="utf-8"?>
<LinearLayout xmlns:android="http://schemas.android.com/apk/res/android"
    android:orientation="vertical" android:layout_width="fill_parent"
    android:layout_height="wrap_content">
    <LinearLayout android:id="@+id/linearLayout3"
        android:layout_height="wrap_content" android:layout_width="match_parent"
        android:orientation="vertical">
        <Chronometer android:id="@+id/chronometer1"
            android:layout_weight="1" android:layout_width="wrap_content"
            android:text="Chronometer" android:layout_height="wrap_content"
            android:format="起動からの時間 %s"></Chronometer>
        <TextView android:layout_weight="1" android:layout_width="fill_parent"
            android:text="スタートのSystemClock.elapsedRealtime()" android:id="@+id/startText"
            android:layout_height="wrap_content"></TextView>
        <TextView android:layout_width="wrap_content"
            android:layout_height="wrap_content" android:text="ストップのSystemClock.elapsedRealtime()"
            android:id="@+id/stopText"></TextView>
    </LinearLayout>
    <Chronometer android:id="@+id/chronometer2" android:text="Chronometer"
        android:layout_width="wrap_content" android:layout_height="wrap_content"
        android:layout_weight="1"></Chronometer>
    <LinearLayout android:id="@+id/linearLayout1"
        android:layout_width="fill_parent" android:layout_height="wrap_content"
        android:layout_weight="1">
        <Button android:layout_height="wrap_content" android:text="スタート"
            android:id="@+id/start" android:layout_width="wrap_content"
            android:layout_weight="1"></Button>
        <Button android:layout_width="wrap_content"
            android:layout_height="wrap_content" android:id="@+id/stop"
            android:text="ストップ" android:layout_weight="1"></Button>
    </LinearLayout>
    <LinearLayout android:id="@+id/linearLayout2"
        android:layout_height="wrap_content" android:layout_width="match_parent"
        android:layout_weight="1">
        <Button android:text="リスタート" android:layout_width="wrap_content"
            android:layout_height="wrap_content" android:id="@+id/restart"
            android:layout_weight="1"></Button>
        <Button android:text="スプリット" android:layout_width="wrap_content"
            android:layout_height="wrap_content" android:id="@+id/split"
            android:layout_weight="1"></Button>
    </LinearLayout>
</LinearLayout>
ダウンロード

ダイアログにチェックボックス

package com.alertDialogText;

import android.app.Activity;
import android.app.AlertDialog;
import android.content.DialogInterface;
import android.os.Bundle;

public class AlertDialogText extends Activity {
 /** Called when the activity is first created. */
 @Override
 public void onCreate(Bundle savedInstanceState) {
  super.onCreate(savedInstanceState);
  setContentView(R.layout.main);

  // ダイアログのオブジェクト(dlg) 生成
  AlertDialog.Builder dlg = new AlertDialog.Builder(this);

  // ダイアログにタイトルを指定
  dlg.setTitle("タイトル");

  // ダイアログにチェックボックスを指定
  final CharSequence[] items = {"Red", "Green", "Blue"};
  final boolean[] checkedItems = {true, false, true};
  dlg.setMultiChoiceItems(items, checkedItems,
    new DialogInterface.OnMultiChoiceClickListener() {
     public void onClick(DialogInterface dialog, int which,
       boolean isChecked) {
      checkedItems[which] = isChecked;
     }
    });

  // ダイアログを表示
  dlg.show();
 }
}
ボタンと併用するのがいいかも
ダイアログにラジオボタン

package com.alertDialogText;

import android.app.Activity;
import android.app.AlertDialog;
import android.content.DialogInterface;
import android.os.Bundle;
import android.widget.Toast;

public class AlertDialogText extends Activity {
 /** Called when the activity is first created. */
 @Override
 public void onCreate(Bundle savedInstanceState) {
  super.onCreate(savedInstanceState);
  setContentView(R.layout.main);

  // ダイアログのオブジェクト(dlg) 生成
  AlertDialog.Builder dlg = new AlertDialog.Builder(this);

  // ダイアログにタイトルを指定
  dlg.setTitle("タイトル");

  // ダイアログにチェックボックスを指定
  final CharSequence[] items = {"Red", "Green", "Blue"};
  dlg.setSingleChoiceItems(items, -1, new DialogInterface.OnClickListener() {
      public void onClick(DialogInterface dialog, int item) {
          Toast.makeText(getApplicationContext(), items[item], Toast.LENGTH_SHORT).show();
      }
  });

  // ダイアログを表示
  dlg.show();
 }
}
ラジオボタンをクリックしても閉じないのでボタンと併用するのがいいかも
ダイアログにリストを表示

package com.alertDialogText;

import android.app.Activity;
import android.app.AlertDialog;
import android.content.DialogInterface;
import android.os.Bundle;
import android.widget.Toast;

public class AlertDialogText extends Activity {
 /** Called when the activity is first created. */
 @Override
 public void onCreate(Bundle savedInstanceState) {
  super.onCreate(savedInstanceState);
  setContentView(R.layout.main);

  // ダイアログのオブジェクト(dlg) 生成
  AlertDialog.Builder dlg = new AlertDialog.Builder(this);

  // ダイアログにタイトルを指定
  dlg.setTitle("タイトル");

  // ダイアログにリストを指定
  final CharSequence[] items = { "Red", "Green", "Blue" };
  dlg.setItems(items, new DialogInterface.OnClickListener() {
   public void onClick(DialogInterface dialog, int item) {
    Toast.makeText(getApplicationContext(), items[item],
      Toast.LENGTH_SHORT).show();
   }
  });

  // ダイアログを表示
  dlg.show();
 }
}
setTitle(""); と同時には使えないみたいです。
カスタムダイアログ
XMLファイルで書かれたレイアウトを、
メッセージ部分に表示してみました。


package com.alertDialogText;

import android.app.Activity;
import android.app.AlertDialog;
import android.content.DialogInterface;
import android.os.Bundle;
import android.view.LayoutInflater;
import android.view.View;

public class AlertDialogText extends Activity {
 /** Called when the activity is first created. */
 @Override
 public void onCreate(Bundle savedInstanceState) {
  super.onCreate(savedInstanceState);
  setContentView(R.layout.main);

  //レイアウトの呼び出し
  LayoutInflater factory = LayoutInflater.from(this);
  final View inputView = factory.inflate(R.layout.about, null);

  // ダイアログのオブジェクト(dlg) 生成
  AlertDialog.Builder dlg = new AlertDialog.Builder(this);

  // ダイアログにタイトルを指定
  dlg.setTitle("タイトル");

  // ダイアログにメッセージを指定
  dlg.setMessage("ダイアログのメッセージ");

  //カスタムレイアウトの表示
  dlg.setView(inputView);

  // ダイアログにアイコンを指定
  dlg.setIcon(R.drawable.icon);

  // アラートダイアログのポジティブボタンがクリックされた時に呼び出されるコールバックリスナーを登録します
  dlg.setPositiveButton("ポジティブ", new DialogInterface.OnClickListener() {
   @Override
   public void onClick(DialogInterface dialog, int which) {
   }
  });
  // アラートダイアログのニュートラルボタンがクリックされた時に呼び出されるコールバックリスナーを登録します
  dlg.setNeutralButton("ニュートラル", new DialogInterface.OnClickListener() {
   @Override
   public void onClick(DialogInterface dialog, int which) {
   }
  });
  // アラートダイアログのネガティブボタンがクリックされた時に呼び出されるコールバックリスナーを登録します
  dlg.setNegativeButton("ネガティブ", new DialogInterface.OnClickListener() {
   @Override
   public void onClick(DialogInterface dialog, int which) {
   }
  });

  // ダイアログを表示
  dlg.show();
 }
}
<?xml version="1.0" encoding="utf-8"?>
<LinearLayout xmlns:android="http://schemas.android.com/apk/res/android"
    android:orientation="vertical" android:padding="10dip"
    android:layout_width="match_parent" android:layout_height="match_parent"
    android:id="@+id/dlgLayout">
    <TextView android:layout_width="fill_parent"
        android:layout_height="wrap_content" android:textSize="18.0sp"
        android:paddingBottom="5dip" android:text="XML レイアウトを読み込み" />
    <CheckBox android:text="CheckBox" android:id="@+id/checkBox1"
        android:layout_width="wrap_content" android:layout_height="wrap_content"></CheckBox>
    <TextView android:layout_width="fill_parent"
        android:layout_height="wrap_content" android:gravity="center"
        android:textSize="18.0sp" android:text="メッセージ" />
    <LinearLayout android:layout_width="match_parent"
        android:id="@+id/linearLayout1" android:layout_height="wrap_content">
        <Button android:id="@+id/button1" android:text="Button"
            android:layout_height="wrap_content" android:layout_weight="1"
            android:layout_width="fill_parent"></Button>
        <Button android:id="@+id/button2" android:text="Button"
            android:layout_height="wrap_content" android:layout_weight="1"
            android:layout_width="fill_parent"></Button>
    </LinearLayout>
</LinearLayout>
用意されている3つのボタンを表示

package com.alertDialogText;

import android.app.Activity;
import android.app.AlertDialog;
import android.content.DialogInterface;
import android.os.Bundle;

public class AlertDialogText extends Activity {
 /** Called when the activity is first created. */
 @Override
 public void onCreate(Bundle savedInstanceState) {
  super.onCreate(savedInstanceState);
  setContentView(R.layout.main);

  // ダイアログのオブジェクト(dlg) 生成
  AlertDialog.Builder dlg = new AlertDialog.Builder(this);

  // ダイアログにタイトルを指定
  dlg.setTitle("タイトル");

  // ダイアログにメッセージを指定
  dlg.setMessage("ダイアログのメッセージ");

  // ダイアログにアイコンを指定
  dlg.setIcon(R.drawable.icon);

  // アラートダイアログのポジティブボタンがクリックされた時に呼び出されるコールバックリスナーを登録します
  dlg.setPositiveButton("ポジティブ", new DialogInterface.OnClickListener() {
   @Override
   public void onClick(DialogInterface dialog, int which) {
   }
  });
  // アラートダイアログのニュートラルボタンがクリックされた時に呼び出されるコールバックリスナーを登録します
  dlg.setNeutralButton("ニュートラル", new DialogInterface.OnClickListener() {
   @Override
   public void onClick(DialogInterface dialog, int which) {
   }
  });
  // アラートダイアログのネガティブボタンがクリックされた時に呼び出されるコールバックリスナーを登録します
  dlg.setNegativeButton("ネガティブ", new DialogInterface.OnClickListener() {
   @Override
   public void onClick(DialogInterface dialog, int which) {
   }
  });

  // ダイアログを表示
  dlg.show();
 }
}
アラートダイアログにボタンを表示

package com.alertDialogText;

import android.app.Activity;
import android.app.AlertDialog;
import android.content.DialogInterface;
import android.os.Bundle;

public class AlertDialogText extends Activity {
 /** Called when the activity is first created. */
 @Override
 public void onCreate(Bundle savedInstanceState) {
  super.onCreate(savedInstanceState);
  setContentView(R.layout.main);

  // ダイアログのオブジェクト(dlg) 生成
  AlertDialog.Builder dlg = new AlertDialog.Builder(this);

  // ダイアログにタイトルを指定
  dlg.setTitle("タイトル");

  // ダイアログにメッセージを指定
  dlg.setMessage("ダイアログのメッセージ");

  // ダイアログにアイコンを指定
  dlg.setIcon(R.drawable.icon);

  // アラートダイアログのポジティブボタンがクリックされた時に呼び出されるコールバックリスナーを登録します
  dlg.setPositiveButton("ポジティブ", new DialogInterface.OnClickListener() {
   @Override
   public void onClick(DialogInterface dialog, int which) {
    //ボタンが押された時の処理
   }
  });

  // ダイアログを表示
  dlg.show();
 }
}
アラートダイアログにアイコンを表示

package com.alertDialogText;

import android.app.Activity;
import android.app.AlertDialog;
import android.os.Bundle;

public class AlertDialogText extends Activity {
 /** Called when the activity is first created. */
 @Override
 public void onCreate(Bundle savedInstanceState) {
  super.onCreate(savedInstanceState);
  setContentView(R.layout.main);

  // ダイアログのオブジェクト(dlg) 生成
  AlertDialog.Builder dlg = new AlertDialog.Builder(this);

  // ダイアログにタイトルを指定
  dlg.setTitle("タイトル");

  // ダイアログにメッセージを指定
  dlg.setMessage("ダイアログのメッセージ");

  // ダイアログにアイコンを指定
  dlg.setIcon(R.drawable.icon);

  // ダイアログを表示
  dlg.show();
 }
}
アラートダイアログにメッセージを表示

package com.alertDialogText;

import android.app.Activity;
import android.app.AlertDialog;
import android.os.Bundle;

public class AlertDialogText extends Activity {
    /** Called when the activity is first created. */
    @Override
    public void onCreate(Bundle savedInstanceState) {
        super.onCreate(savedInstanceState);
        setContentView(R.layout.main);

        //ダイアログのオブジェクト(dlg) 生成
        AlertDialog.Builder dlg = new AlertDialog.Builder(this);

        //ダイアログにタイトルを指定
        dlg.setTitle("タイトル");

        //ダイアログにメッセージを指定
        dlg.setMessage("ダイアログのメッセージ");

        //ダイアログを表示
        dlg.show();
    }
}
とりあえずタイトルのみで表示

package com.alertDialogText;

import android.app.Activity;
import android.app.AlertDialog;
import android.os.Bundle;

public class AlertDialogText extends Activity {
    /** Called when the activity is first created. */
    @Override
    public void onCreate(Bundle savedInstanceState) {
        super.onCreate(savedInstanceState);
        setContentView(R.layout.main);

        //ダイアログのオブジェクト(dlg) 生成
        AlertDialog.Builder dlg = new AlertDialog.Builder(this);

        //ダイアログのタイトルを指定
        dlg.setTitle("タイトル");

        //ダイアログを表示
        dlg.show();
    }
}
2011年6月8日水曜日
値の取得-getText

Chronometerに表示されている文字をボタンクリックでダイアログに表示
package com.GetTextTest;

import android.app.Activity;
import android.app.AlertDialog;
import android.os.Bundle;
import android.view.View;
import android.widget.Chronometer;

public class GetTextTest extends Activity {
 /** Called when the activity is first created. */
 @Override
 public void onCreate(Bundle savedInstanceState) {
  super.onCreate(savedInstanceState);
  setContentView(R.layout.main);

  Chronometer chronometer = (Chronometer) findViewById(R.id.chronometer1);
  chronometer.setFormat("クロノメーター %s");
  chronometer.start();

 }

 public void SetButtonOnClick(View v) {
  Chronometer chronometer = (Chronometer) findViewById(R.id.chronometer1);
  new AlertDialog.Builder(this).setMessage(chronometer.getText()).show();
 }
}
値の取得-getText
TextView に設定してあるテキストを取得して、
ダイアログで表示する。
ダイアログで表示する。
package com.GetTextTest;

import android.app.Activity;
import android.app.AlertDialog;
import android.os.Bundle;
import android.widget.TextView;

public class GetTextTest extends Activity {
    /** Called when the activity is first created. */
    @Override
    public void onCreate(Bundle savedInstanceState) {
        super.onCreate(savedInstanceState);
        setContentView(R.layout.main);

        TextView textView = (TextView) findViewById(R.id.hello);

        new AlertDialog.Builder(this).setMessage(textView.getText()).show();

    }
}
2011年6月7日火曜日
Installation error
[2011-06-07 19:40:32 - Stopwatch] Installation error: INSTALL_FAILED_OLDER_SDK
[2011-06-07 19:40:32 - Stopwatch] Please check logcat output for more details.
[2011-06-07 19:40:32 - Stopwatch] Launch canceled!
AndroidManifest.xml ファイルを開く
<uses-sdk android:minSdkVersion="8" />
8を7に変える
またはコメントアウトする
<!--
<uses-sdk android:minSdkVersion="8" />
-->
[2011-06-07 19:40:32 - Stopwatch] Please check logcat output for more details.
[2011-06-07 19:40:32 - Stopwatch] Launch canceled!
AndroidManifest.xml ファイルを開く
<uses-sdk android:minSdkVersion="8" />
8を7に変える
またはコメントアウトする
<!--
<uses-sdk android:minSdkVersion="8" />
-->
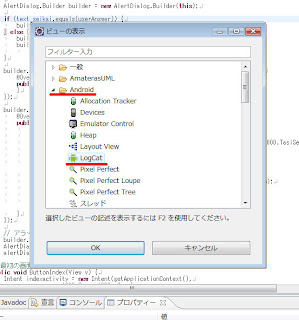
Log.d()でログ出力
LogCat にメッセージを出力する。
デバッグログ (debug) Log.d
エラーログ (error) Log.e
情報ログ (info) Log.i
詳細ログ (verbose) Log.v
警告ログ (warn) Log.w

デバッグログ (debug) Log.d
エラーログ (error) Log.e
情報ログ (info) Log.i
詳細ログ (verbose) Log.v
警告ログ (warn) Log.w
Log.d("タグ", "メッセージ");
ビューにLogCat を追加する。
メニューバーからウインドウ->ビューの表示->その他 を選んで
ビューの表示ダイアログが表示されるので、
Android から LogCat を選択し OKボタンをクリックする。

LogCat が表示される。

 数値を表示したい場合
String[] str;
Log.d("タグ", String.valueOf(str.length));
2011年6月5日日曜日
オブジェクトの配置方法を指定-Gravity
top
コンテナの上部に配置し、サイズ変更は行いません。
bottom
コンテナの下部に配置し、サイズ変更は行いません。
left
コンテナの左側に配置し、サイズ変更は行いません。
right
コンテナの右側に配置し、サイズ変更は行いません。
center_vertical
上下中央に配置し、サイズ変更は行いません。
fill_vertical
オブジェクトの高さを、コンテナのサイズに合わせます。
center_horizontal
左右中央に配置し、サイズ変更は行いません。
fill_horizontal
オブジェクトの幅を、コンテナのサイズに合わせます。
center
上下左右中央に配置し、サイズ変更は行いません。
fill
デフォルト、 オブジェクトの高さ・幅を、コンテナのサイズに合わせます。
clip_vertical
top/bottomの追加オプションとして、オブジェクトの上部/下部の境界をコンテナの境界に合わせます。
clip_horizontal
left/rightの追加オプションとして、オブジェクトの左側/右側の境界をコンテナの境界に合わせます。
ドラッグで画像移動-FrameLayout+重なり判定-getHitRect
ドラッグ&ドロップをFrameLayout で実現
重なりの判定がズレる不具合に悩まされましたが
ボタンのプロパティーのlayout_heightとlayout_widthをfill_parentに設定すればいいようです。
fill_parentに設定する為にTableLayoutの中にボタンを置きました。
アイコン画像をドラッグしてボタンの上に重ねると初期画面にする。
ダウンロード
重なりの判定がズレる不具合に悩まされましたが
ボタンのプロパティーのlayout_heightとlayout_widthをfill_parentに設定すればいいようです。
fill_parentに設定する為にTableLayoutの中にボタンを置きました。
アイコン画像をドラッグしてボタンの上に重ねると初期画面にする。
package com.drag;

import android.app.Activity;
import android.content.Intent;
import android.graphics.Rect;
import android.os.Bundle;
import android.view.MotionEvent;
import android.view.View;
import android.view.View.OnTouchListener;
import android.widget.Button;
import android.widget.ImageView;

public class Drag extends Activity implements OnTouchListener {
 /** Called when the activity is first created. */
 ImageView target;
 int currentX;
 int currentY;
 int offsetX;
 int offsetY;

 @Override
 public void onCreate(Bundle savedInstanceState) {
  super.onCreate(savedInstanceState);
  setContentView(R.layout.main);

  target = (ImageView) findViewById(R.id.ImageView01);
  this.target.setOnTouchListener(this);
 }

 public void onClickButton02(View v) {
  Intent intent = new Intent(Drag.this, Drag.class);
  startActivity(intent);
 }

 @Override
 public boolean onTouch(View v, MotionEvent event) {
  // TODO 自動生成されたメソッド・スタブ
  int x = (int) event.getRawX();
  int y = (int) event.getRawY();

  Button bt2 = (Button) findViewById(R.id.Button02);

  if (event.getAction() == MotionEvent.ACTION_MOVE) {

   int diffX = offsetX - x;
   int diffY = offsetY - y;

   currentX -= diffX;
   currentY -= diffY;
   target.layout(currentX, currentY, currentX + target.getWidth(),
     currentY + target.getHeight());

   offsetX = x;
   offsetY = y;

  } else if (event.getAction() == MotionEvent.ACTION_DOWN) {
   offsetX = x;
   offsetY = y;
  } else if (event.getAction() == MotionEvent.ACTION_UP) {
   int[] offset = new int[2];
   bt2.getLocationOnScreen(offset);
   Rect rect = new Rect();

   bt2.getHitRect(rect);
   rect.offset(offset[0], offset[1]);

   if (rect.contains((int) event.getRawX(), (int) event.getRawY())) {
   // if (rect.contains(x, y)) {
    bt2.performClick();
   }
  }
  return true;
 }
}
ダウンロード
2011年6月4日土曜日
ドラッグで画像移動-Canvas
package com.androidGui;

import android.app.Activity;
import android.content.Context;
import android.graphics.Bitmap;
import android.graphics.BitmapFactory;
import android.graphics.Canvas;
import android.graphics.Paint;
import android.os.Bundle;
import android.view.MotionEvent;
import android.view.View;

public class AndroidGui extends Activity {
 /** Called when the activity is first created. */
 @Override
 public void onCreate(Bundle savedInstanceState) {
  super.onCreate(savedInstanceState);

  setContentView(new SampleView(this));
 }

 private class SampleView extends View {

  private Paint mPaint;
  private float imageX;
  private float imageY;
  private Bitmap mBitmap;

  public SampleView(Context context) {
   super(context);
   // TODO 自動生成されたコンストラクター・スタブ
   mPaint = new Paint();
  }

  @Override
  protected void onDraw(Canvas canvas) {
   // 画像表示
   mBitmap = BitmapFactory.decodeResource(getResources(), R.drawable.icon);
   canvas.drawBitmap(mBitmap, imageX - mBitmap.getWidth() / 2,
     imageY - mBitmap.getHeight() / 2, mPaint);
  }

  @Override
  public boolean onTouchEvent(MotionEvent event) {

   // 触る
   if (event.getAction() == MotionEvent.ACTION_DOWN) {
    imageX = event.getX();
    imageY = event.getY();
   }
   // 触ったままスライド
   else if (event.getAction() == MotionEvent.ACTION_MOVE) {
    imageX = event.getX();
    imageY = event.getY();
   }

   // 離す
   else if (event.getAction() == MotionEvent.ACTION_UP) {
    imageX = event.getX();
    imageY = event.getY();
   }

   // 再描画の指示
   invalidate();

   return true;
  }

 }
}
ダウンロード
2011年6月3日金曜日
custom viewをxmlで定義する場合

main.xml のソース
<?xml version="1.0" encoding="utf-8"?>
<LinearLayout xmlns:android="http://schemas.android.com/apk/res/android"
    android:orientation="vertical"
    android:layout_width="fill_parent"
    android:layout_height="fill_parent">
    <TextView android:layout_width="fill_parent"
        android:layout_height="wrap_content"
        android:text="@string/hello"
    />
    <com.androidGui.CustomView
        android:id="@+id/custumView"
        android:layout_width="wrap_content"
        android:layout_height="fill_parent"
    />
</LinearLayout>
CustomView.java のソース
package com.androidGui;

import android.content.Context;
import android.graphics.Canvas;
import android.graphics.Color;
import android.util.AttributeSet;
import android.view.View;

public class CustomView extends View {
 public CustomView(Context context, AttributeSet attrs) {
  super(context);
  setFocusable(true);
 }

 protected void onDraw(Canvas canvas) {
  super.onDraw(canvas);
  // 通常はグラフィックを描画するコードをここに記述する。
  canvas.drawColor(Color.BLUE);
 }

}
【注意】コンストラクタを追加するとき、
public CustomView(Context context) {
でない事に注意する。setFocusable(true);も必ず必要か?
AndroidGui.java のソース
package com.androidGui;

import android.app.Activity;
import android.os.Bundle;

public class AndroidGui extends Activity {
    /** Called when the activity is first created. */
    @Override
    public void onCreate(Bundle savedInstanceState) {
        super.onCreate(savedInstanceState);
        setContentView(R.layout.main);
    }
}

追記:2013/0313
独自のViewクラスを使う
Viewクラスを継承した独自のViewクラスを定義して表示させる。
srcフォルダの中のパケージを選択して右クリックして、新規を選択して、クラスをクリックする。

CustomView.java が作成されるのでソースを記入します。
Viewのコンストラクタは3種類のいずれか、もしくは、すべてを作成しておく必要があります。
コードからビューを作るための単純なコンストラクタである。
public View(Context context)
xmlレイアウトファイルに記述してViewを作るためのコンストラクタである。
xmlに記述したアトリビュートをattrsから取得できる。
public View(Context context, AttributeSet attrs)
スタイルを指定した場合はdefStyleを持つ3つめのコンストラクタが利用されます。
public View(Context context, AttributeSet attrs, int defStyle)

srcフォルダの中のパケージを選択して右クリックして、新規を選択して、クラスをクリックする。

CustomView.java が作成されるのでソースを記入します。
package com.androidGui;

import android.content.Context;
import android.graphics.Canvas;
import android.graphics.Color;
import android.view.View;

public class CustomView extends View {
 public CustomView(Context context) {
  super(context);
  setFocusable(true);
 }

 protected void onDraw(Canvas canvas) {
  super.onDraw(canvas);
  // 青で塗りつぶす
  canvas.drawColor(Color.BLUE);
 }

}
Viewのコンストラクタは3種類のいずれか、もしくは、すべてを作成しておく必要があります。
コードからビューを作るための単純なコンストラクタである。
public View(Context context)
xmlレイアウトファイルに記述してViewを作るためのコンストラクタである。
xmlに記述したアトリビュートをattrsから取得できる。
public View(Context context, AttributeSet attrs)
スタイルを指定した場合はdefStyleを持つ3つめのコンストラクタが利用されます。
public View(Context context, AttributeSet attrs, int defStyle)
package com.androidGui;

import android.app.Activity;
import android.os.Bundle;

public class AndroidGui extends Activity {
    /** Called when the activity is first created. */
    @Override
    public void onCreate(Bundle savedInstanceState) {
        super.onCreate(savedInstanceState);

        //Activityに直接を追加する
        setContentView(new CustomView(this));
    }
}

複数のウィジェットを画面に表示

複数のウィジェットを画面に表示させる場合には、
コンテンツビューとなるViewオブジェクトにViewGroupクラスを継承したクラスの
オブジェクト(
LinearLayout)を指定します。ViewGroupクラスはaddViewメソッドを使って、
ViewGroupクラスの中にViewクラスを継承したクラスを複数配置する事ができます。
package com.androidGui;

import android.app.Activity;
import android.os.Bundle;
import android.widget.Button;
import android.widget.LinearLayout;
import android.widget.TextView;

public class AndroidGui extends Activity {
    /** Called when the activity is first created. */
    @Override
    public void onCreate(Bundle savedInstanceState) {
        super.onCreate(savedInstanceState);

     // ViewGroupクラスのサブクラスLinearLayoutのインスタンスを作成し、
     // contentViewに設定。
     LinearLayout layout = new LinearLayout(this);
     layout.setOrientation(LinearLayout.VERTICAL);
     setContentView(layout);

     // TextViewオブジェクトを作成し、LinearLayoutオブジェクトに追加
     TextView tv = new TextView(this);
     tv.setText("TextViewの文字");
     layout.addView(tv);

     // Buttonオブジェクトを作成し、LinearLayoutオブジェクトに追加
     Button button = new Button(this);
     button.setText("ボタンの文字");
     layout.addView(button);
    }
}
エニュレータの起動が遅い
エニュレータの起動が遅いのはどうしようもないので、
エニュレータを起動した状態で開発を進めるのがいいと思います。
実行ボタンを押してエニュレータ起動させた場合、最初は普通に起動しますが、
次に、エニュレータを起動して実行した場合、
androidのバーションが1.6だとエラーが出るので
私はandroidのバーション2.2を使っています。
エニュレータを起動した状態で開発を進めるのがいいと思います。
実行ボタンを押してエニュレータ起動させた場合、最初は普通に起動しますが、
次に、エニュレータを起動して実行した場合、
androidのバーションが1.6だとエラーが出るので
私はandroidのバーション2.2を使っています。
TextViewを画面に表示

package com.androidGui;

import android.app.Activity;
import android.os.Bundle;
import android.widget.TextView;

public class AndroidGui extends Activity {
    /** Called when the activity is first created. */
    @Override
    public void onCreate(Bundle savedInstanceState) {
        super.onCreate(savedInstanceState);

        TextView tv = new TextView(this);
        tv.setText("TextViewに表示する文字");
        setContentView(tv);
    }
}
MotionEvent.getEdgeFlags()で画面端の判定
MotionEvent.getAction()で取得できる動作
| 定数名 | 説明 |
|---|---|
| ACTION_DOWN | 0x02 タッチ押下 |
| ACTION_MOVE | 0x00 指を持ち上げずにスライドさせた場合 |
| ACTION_UP | 0x01 指を持ち上げた場合 |
| ACTION_CANCEL | 0x03 UP+DOWNの同時発生(=キャンセル)の場合 |
| ACTION_OUTSIDE | 0x04 ターゲットとするUIの範囲外を押下 |
MotionEvent.getAction()で取得できる動作
MotionEventの主なメソッド

| MotionEventメソッド名 | 説明 |
|---|---|
| getX() , getY() | タッチされてたX,Y座標 |
| getAction() | タッチイベントのアクション |
| getDownTime() | 押されていた時間(ms単位) |
| getEdgeFlags() | スクリーン端判定 |
| getSize() | タッチされている範囲、サイズ(推定) |
| getEventTime() | タッチされていた継続時間(ms単位) |
| getPressure() | タッチされた圧力 |
package com.touchEvent;

import android.app.Activity;
import android.os.Bundle;
import android.util.Log;
import android.view.MotionEvent;

public class touchEvent extends Activity {
    /** Called when the activity is first created. */
    @Override
    public void onCreate(Bundle savedInstanceState) {
        super.onCreate(savedInstanceState);
        setContentView(R.layout.main);
    }

    @Override
    public boolean onTouchEvent(MotionEvent event) {
        Log.d("TouchEvent", "X:" + event.getX() + ",Y:" + event.getY());

        switch (event.getAction()) {
        case MotionEvent.ACTION_DOWN:
            Log.d("TouchEvent", "getAction()" + "ACTION_DOWN");
            break;
        case MotionEvent.ACTION_UP:
            Log.d("TouchEvent", "getAction()" + "ACTION_UP");
            break;
        case MotionEvent.ACTION_MOVE:
            Log.d("TouchEvent", "getAction()" + "ACTION_MOVE");
            break;
        case MotionEvent.ACTION_CANCEL:
            Log.d("TouchEvent", "getAction()" + "ACTION_CANCEL");
            break;
        }

        return true;
    }
}

onTouchEvent
画面をタッチした場所の座標をDDMSのLogcatに表示
onTouchEventメソッドを利用してユーザのスクリーン操作を受け取る

ダウンロード
package com.touchEvent;

import android.app.Activity;
import android.os.Bundle;
import android.util.Log;
import android.view.MotionEvent;

public class touchEvent extends Activity {
    /** Called when the activity is first created. */
    @Override
    public void onCreate(Bundle savedInstanceState) {
        super.onCreate(savedInstanceState);
        setContentView(R.layout.main);
    }

    @Override
    public boolean onTouchEvent(MotionEvent event) {
        Log.d("TouchEvent", "X:" + event.getX() + ",Y:" + event.getY());
        return true;
    }
}

ダウンロード
2011年6月1日水曜日
Error in an XML file
レイアウトのXMLファイルを修正後に実行した時にでる。
xxx.out.xml ファイルが自動で作成されているのでそれを削除する。
プロジェクトパッケージを選択して実行する。

xxx.out.xml ファイルが自動で作成されているのでそれを削除する。
プロジェクトパッケージを選択して実行する。

登録:
投稿 (Atom)